How to Make Your First Open Source Contribution Without Knowing Git Commands
Contributing to open source may seem intimidating at first, but it’s actually quite easy! This is a basic guide to help you get started.
1. Create a GitHub Account
Initially, you will require a GitHub account. You may locate and participate in open-source projects here. For developers, it functions similarly to a “social network” where collaborations and projects are shared. It allows collaboration work plus stores the previous works as well, making it easy to retrieve.
2. Find a Repository
The next step is to find a repository which you wish to contribute to. You can search for the repositories which are tagged with “good first issue”, “hacktoberfest” or other similar tags. The tags work the same like in other social media searching platforms. You can also check out repositories in programs like GirlScript Summer of Code (GSSoC) , Season of Docs or First Contributions which provide a list of projects on their official program websites.
The following are the repositories which are perfect for getting your feet wet in open source. (Links to these repository:)
They are beginner-friendly where the contributions are as simple as adding your name to a list. The purpose here is to get you familiar with the process of contributing without worrying about complex coding tasks.
3. Understanding Terms
Before beginning you’ll need to understand some basic GitHub terms:

Repository(repo): A project’s folder where all the code, issues, and pull requests live. (Metamorphically, project’s office with all content present in a single place)
Issue: A way to report bugs, request features, or suggest documentation changes. (a problem or a task that needs attention in the project office, like reporting a broken printer- you will inform the office head, here the project admin about this problem you found)
Pull Request (PR): A way to propose changes to the project. When you’re ready to add your contribution, you create a PR to submit it for review.(a proposed solution to the issue like submitting a fix for the broken printer).
Think of it like a team project: An Issue is when you spot something that needs fixing or improving, and a Pull Request is your suggested solution.
4. Create an Issue
Opening an issue is typically the best way to begin your first contribution.
Here’s how you can do it:
Go to the repo where you want to contribute.
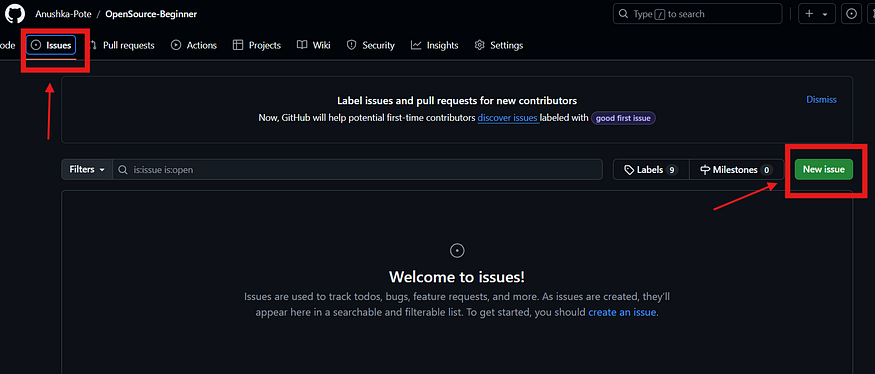
Click on Issues button at top and then add New Issue.

- Add a simple title and description of the problem or suggestion you wish to integrate into the project. (may ask other few questions such as if the issue is a bug, feature suggestion or documentation addition. Answer these as these help the admin to get a clearer idea about your issue)

- Following submission, the issue will be examined by the repository maintainers, who will then assign it to you if they think it’s helpful.

- You can see the assigned issues in notification session, which is beside the profile user icon
5. Fork and Clone the Repository
Once an issue is assigned to you- the next step is to start working on the changes(you can create PR even before the issue is assigned to you).
Forking is always necessary since it allows to work independently without impacting the main project.
Cloning, however isn’t required at the start if you’re not yet comfortable with syntax and commands. Instead, you can make changes directly within GitHub’s web interface.

6. Make Your Changes
To make changes in the GitHub repo:
- Go to your own forked repository (in your repositories when you click on your user icon in top right of Github)

Locate a file you want to edit or work on.
Click on the pencil icon on the top to open file in edit mode. (initially it is read-only mode)

Make your changes directly there (eg- editing text, fixing a bug, or enhancing documentation).
Once you’re done with change- just scroll down and add a commit message describing your change, then click Commit changes.

This way you can begin contributing right from the GitHub website without needing to clone or using Git commands.
7. Submit Pull Request (PR)
Now you are ready to turn in your work. You can directly do it from the forked repository as shown below.

- or might go to the original repository of the admin to create a pull request

Navigate to the Pull Requests tab in project admin repo (from where you forked the version you made changes to).
Then click on New Pull Request button which is where the comparison of your changes is done.

- Compare the branches which we want to by selecting from the options properly, then the create pull request option will turn active green, click on it.
Provide a clear title and description of changes- now called your contribution to the project. This is similar to that of Issue Creation process. You can also add screenshots or other information about the changes you wish to convey to the admin.
Click Create Pull Request to submit it for review.
At this stage, the repository maintainers will review your contribution work and if everything looks good, they’ll merge it into the main project!
Final Thoughts:
If you are worried about not knowing to code or being unfamiliar with any programming language then don’t stress about it cause it’s not a problem! Open-source contributions aren’t limited to just coding or anything fixed to one domain. There is always help needed for improvising documentational content, finding bugs or even just assisting with organization. The key is to just get started. Once you get the idea of the process - your journey to explore more will truly begin. Best of luck and enjoy the adventure ahead!